In this guide, you'll learn how to utilise Pactflow and SwaggerHub together, to add contract testing to your design first API development workflow.
Pactflow and SwaggerHub can be combined to increase the quality of your design-first API development workflow, and help navigate the complexity of microservice rollouts.
SwaggerHub is foundation of a repeatable process for API Development, providing a secure collaborative environment for your API design process:
- It unifies teams around a single source of truth - the OAS - and enables standardisation across your services
- Allows teams to work independently
- Unlocks automation such as code-generation and mock services
Pactflow brings increased visibility into how consumers use your API, enabling:
- API consumer and API producer development teams to work in independently and safely
- Prevent breaking changes to your API and releasing an incompatible API consumer
- A reduction in the need for API versioning, avoiding the need to create and maintain multiple versions of an API, and communicating the change to consumers.
Together, they allow faster feedback cycles from design through to development, test and release.
To use this feature, you will need:
- A Pactflow account (create a free account).
- A SwaggerHub account (create a free account).
Follow this guide to create your first API in SwaggerHub.
Next steps: now that we have agreed on our design, we can get started on our implementation.
- Create OpenAPI Document in SwaggerHub
- Select
Create New->Create new API - Select
Owner - Select
Specification:OpenAPI 3.0.x - Select
Template:--None-- - Select
Name:Enter the name of your API here - Select
Version:1.0.0 - Select
Auto Mock API:off - Select
Create API
- Select
- Create a new repository in GitHub - GitHub Docs
- Create a Github Secret to store your Pactflow API token in.
- In Pactflow:
- Log in to your Pactflow account (
https://<your-subdomain>.pactflow.io), and go to Settings > API Tokens - See here for the docs. - Click the Copy button for the read/write CI token (make sure it's the read write one, not the read only one).
- Log in to your Pactflow account (
- In Github:
- Open your Git project
- Click on the
Settingstab. - Select
Secretsfrom the side menu. - Click
New repository secret(the button is to the right of the "Actions secrets" heading) - Set the name of the secret to
PACT_BROKER_TOKEN - Paste in the Pactflow API token value you copied in the previous step.
- In Pactflow:
- Create a GitHub Actions workflow
- Select
Add File->Create new filein your GitHub Project - Set the title to
.github/workflows/ProviderDesignFeedback.yml - Paste the contents of
.github/workflows/ProviderDesignFeedback.ymlfile from this repository - Set your application name
application_name: swaggerhub-pactflow-providerto your required provider name. This will be used by your consumer to identify the relationship between consumer->provider so should be sensibly named - Update
PACT_BROKER_BASE_URLto the URL of your Pactflow account- In Pactflow:
- Go to Settings > API Tokens.
- Click the
COPY PACTFLOW BASE URLbutton
- In Github:
- Open your project
- Open
.github/workflows/ProviderDesignFeedback.yml - In the upper right corner of the file view, click 🖊️ to open the file editor.
- Update the value of
PACT_BROKER_BASE_URLto the base URL of your own Pactflow account. You can easily get this by clicking the COPY PACTFLOW BASE URL button on the API Tokens page in Pactflow. - Press the green
Commit changesbutton
- Open
- Open your project
- In Pactflow:
- Select
- Sync OpenAPI -> SCM with Github Sync - https://support.smartbear.com/swaggerhub/docs/integrations/github-sync.html
- Open the API page in SwaggerHub.
- Click the API name, switch to the Integrations tab, and click Add New Integrations:
- Select GitHub Sync.
- In the subsequent dialog, specify the integration parameters:
- Name – Required. A display name for the integration.
gh-design-to-pactflow - GitHub Token – Required. The GitHub access token that SwaggerHub will use to access the target GitHub repository.
- The easiest way to get the token is to click Connect to GitHub and allow SwaggerHub to retrieve information from your GitHub account:
- Click Next in the GitHub Token edit box to continue. SwaggerHub will validate the token and then display other parameters.
- Repository Owner – Select you GitHub user or organization that owns the repository you created in the previous step
- Repository – Select the repository you setup earlier to push the code to
- Name – Required. A display name for the integration.
- Sync Method – Select the synchronization type:
Basic Sync - Branch – Required. The repository branch to push the code to. If this branch does not exist, it will be created based on the repository’s default branch. Choose
swaggerhub* - Generated API Code – Required. Select what you want to generate:
YAML(Resolved) - Output Folder - Select
oas - Output File - Select
swagger.yaml - Click
Create And Execute->Done.
- View the GitHub Action run which will upload the Provider contract to Pactflow whenever it changes in SwaggerHub
- Version number =
<OpenAPI SemVer Version>->GitHub Commit Sha>-<design>for traceability on change - OpenAPI + Provider Test Report = Provider Contract Uploaded to Pactflow
- Test Report is just OAS file, as the design will not be tested against an API mock or real implementation at this stage
- Version number =
- Pactflow compares OpenAPI against any registered consumers
- Visibility into affected consumers visible via can-i-deploy or querying Pactflow API
:::note We can actually begin to work on all of next major sections (3, 4 and 5) in parallel. In this guide, we will work through the steps sequentially however to simplify the explanation. :::
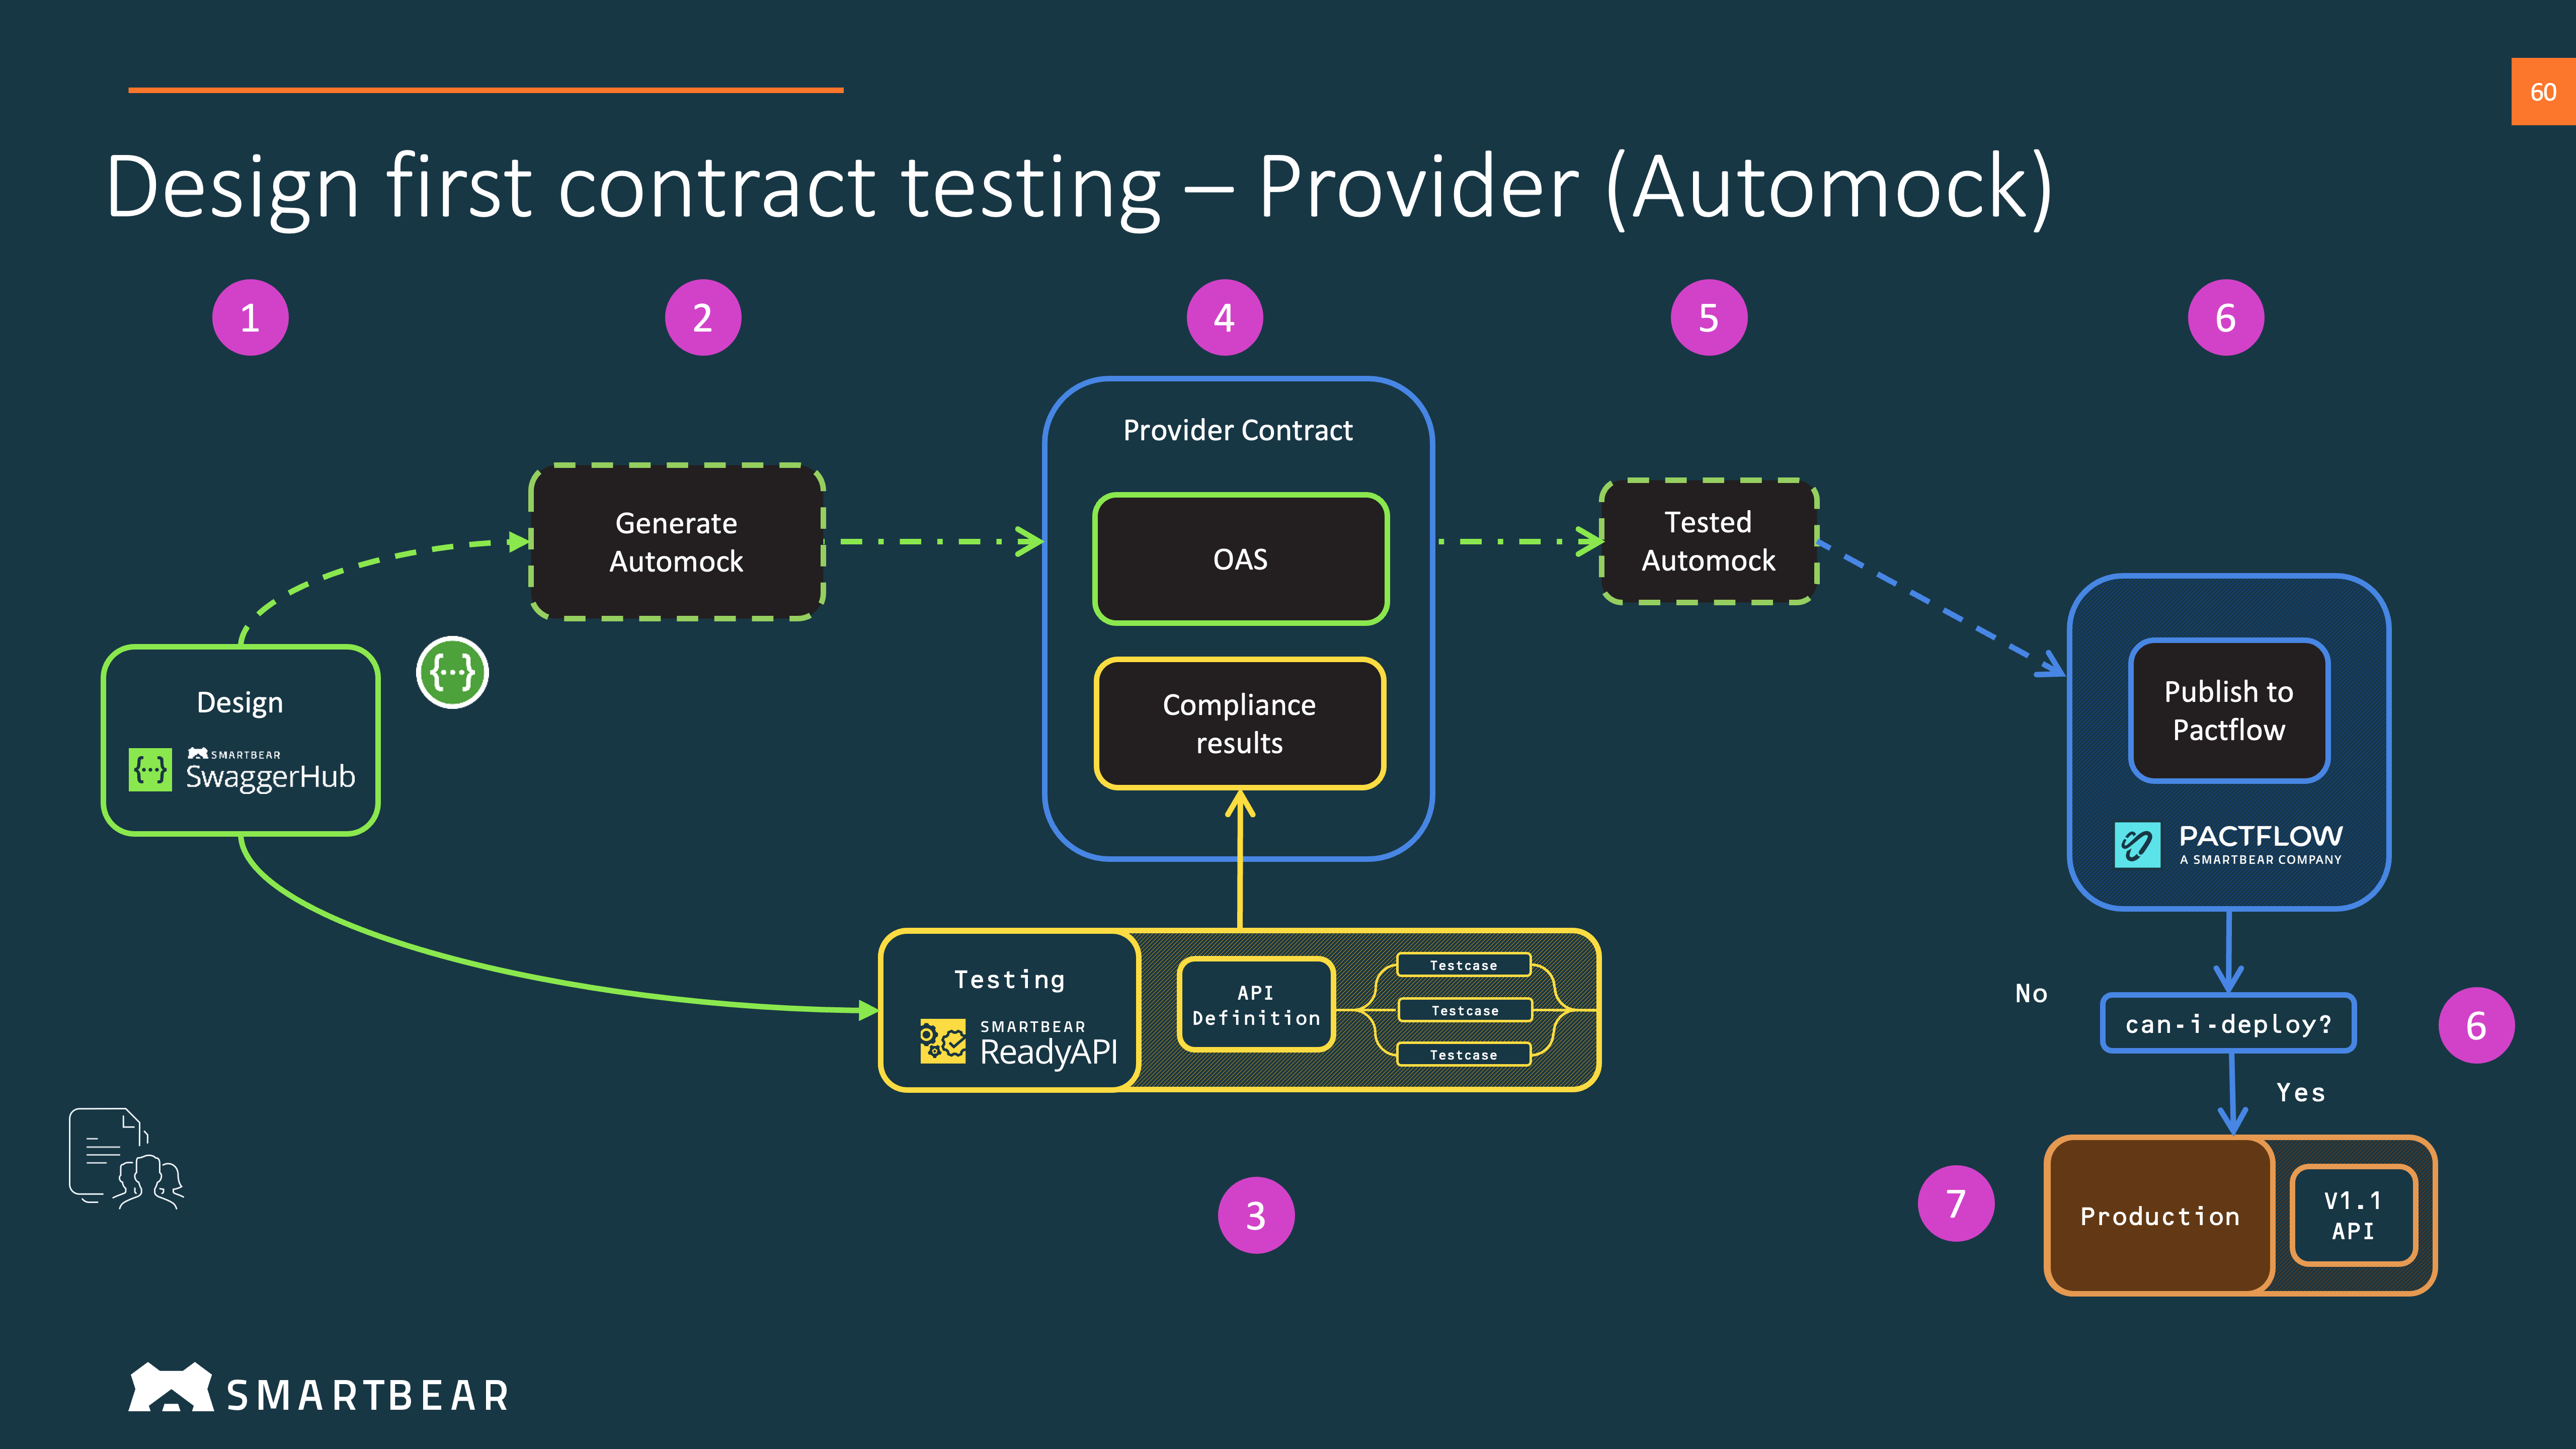
The API Auto Mocking integration creates and maintains a semi-static mock of your API based on the responses and examples defined in your OpenAPI 3.0 or 2.0 definition. The mock is updated every time you save your API. The mock helps you test your API when designing it, that is, before it is implemented by developers. Also, the mock allows developers to start building client applications even before the API back end is ready.
You can use the ./.github/workflows/AutoMock.yml GitHub actions workflow to setup an Auto Mock virtualisation server (also referred to as "VirtServer") from your OpenAPI as it changes in SwaggerHub. The AutoMock will be tested against your specification and the results uploaded to Pactflow.
You will need to setup the following to run this step.
- Add your SwaggerHub API to GitHub Actions Secrets as
SWAGGERHUB_API_KEY - Update
./.github/workflows/AutoMock.ymlapplication_name: set this to the same name as the previous step 1PACT_BROKER_BASE_URL: Your Pactflow broker URLSWAGGERHUB_URL: set to your own otherwise leave as https://api.swaggerhub.comSWAGGERHUB_ORG: Your SwaggerHub OrganisationSWAGGERHUB_API_NAME: The name of the SwaggerHub API, setup in step 1
For the general Provider test and release workflow, see our Provider Side Bi-Directional Contract Testing Guide.
Now that we have an agreed API definition and an implementation (in this case, a Mock of the provider), we can start to build out our test cases whilst the implementation is underway. We will be able to re-use these tests when the real provider is ready for testing.
Start by choosing an API testing tool. See our examples for an idea of how to do this.
Publish your OAS and the test results from your chosen API testing tool to Pactflow.
Check if it's safe to release to your chosen test or staging environment using the can-i-deploy command.
You can now deploy your Auto Mock. In this case, because the Auto Mock is a hosted service from SwaggerHub you don't actually need to perform a real deployment. However, we need to tell Pactflow that it has been deployed and will be used as the provider in a nominated environment.
Use the record-deployment command to record that you have done this with Pactflow.
Consumer Side Bi-Directional Contract Testing Guide
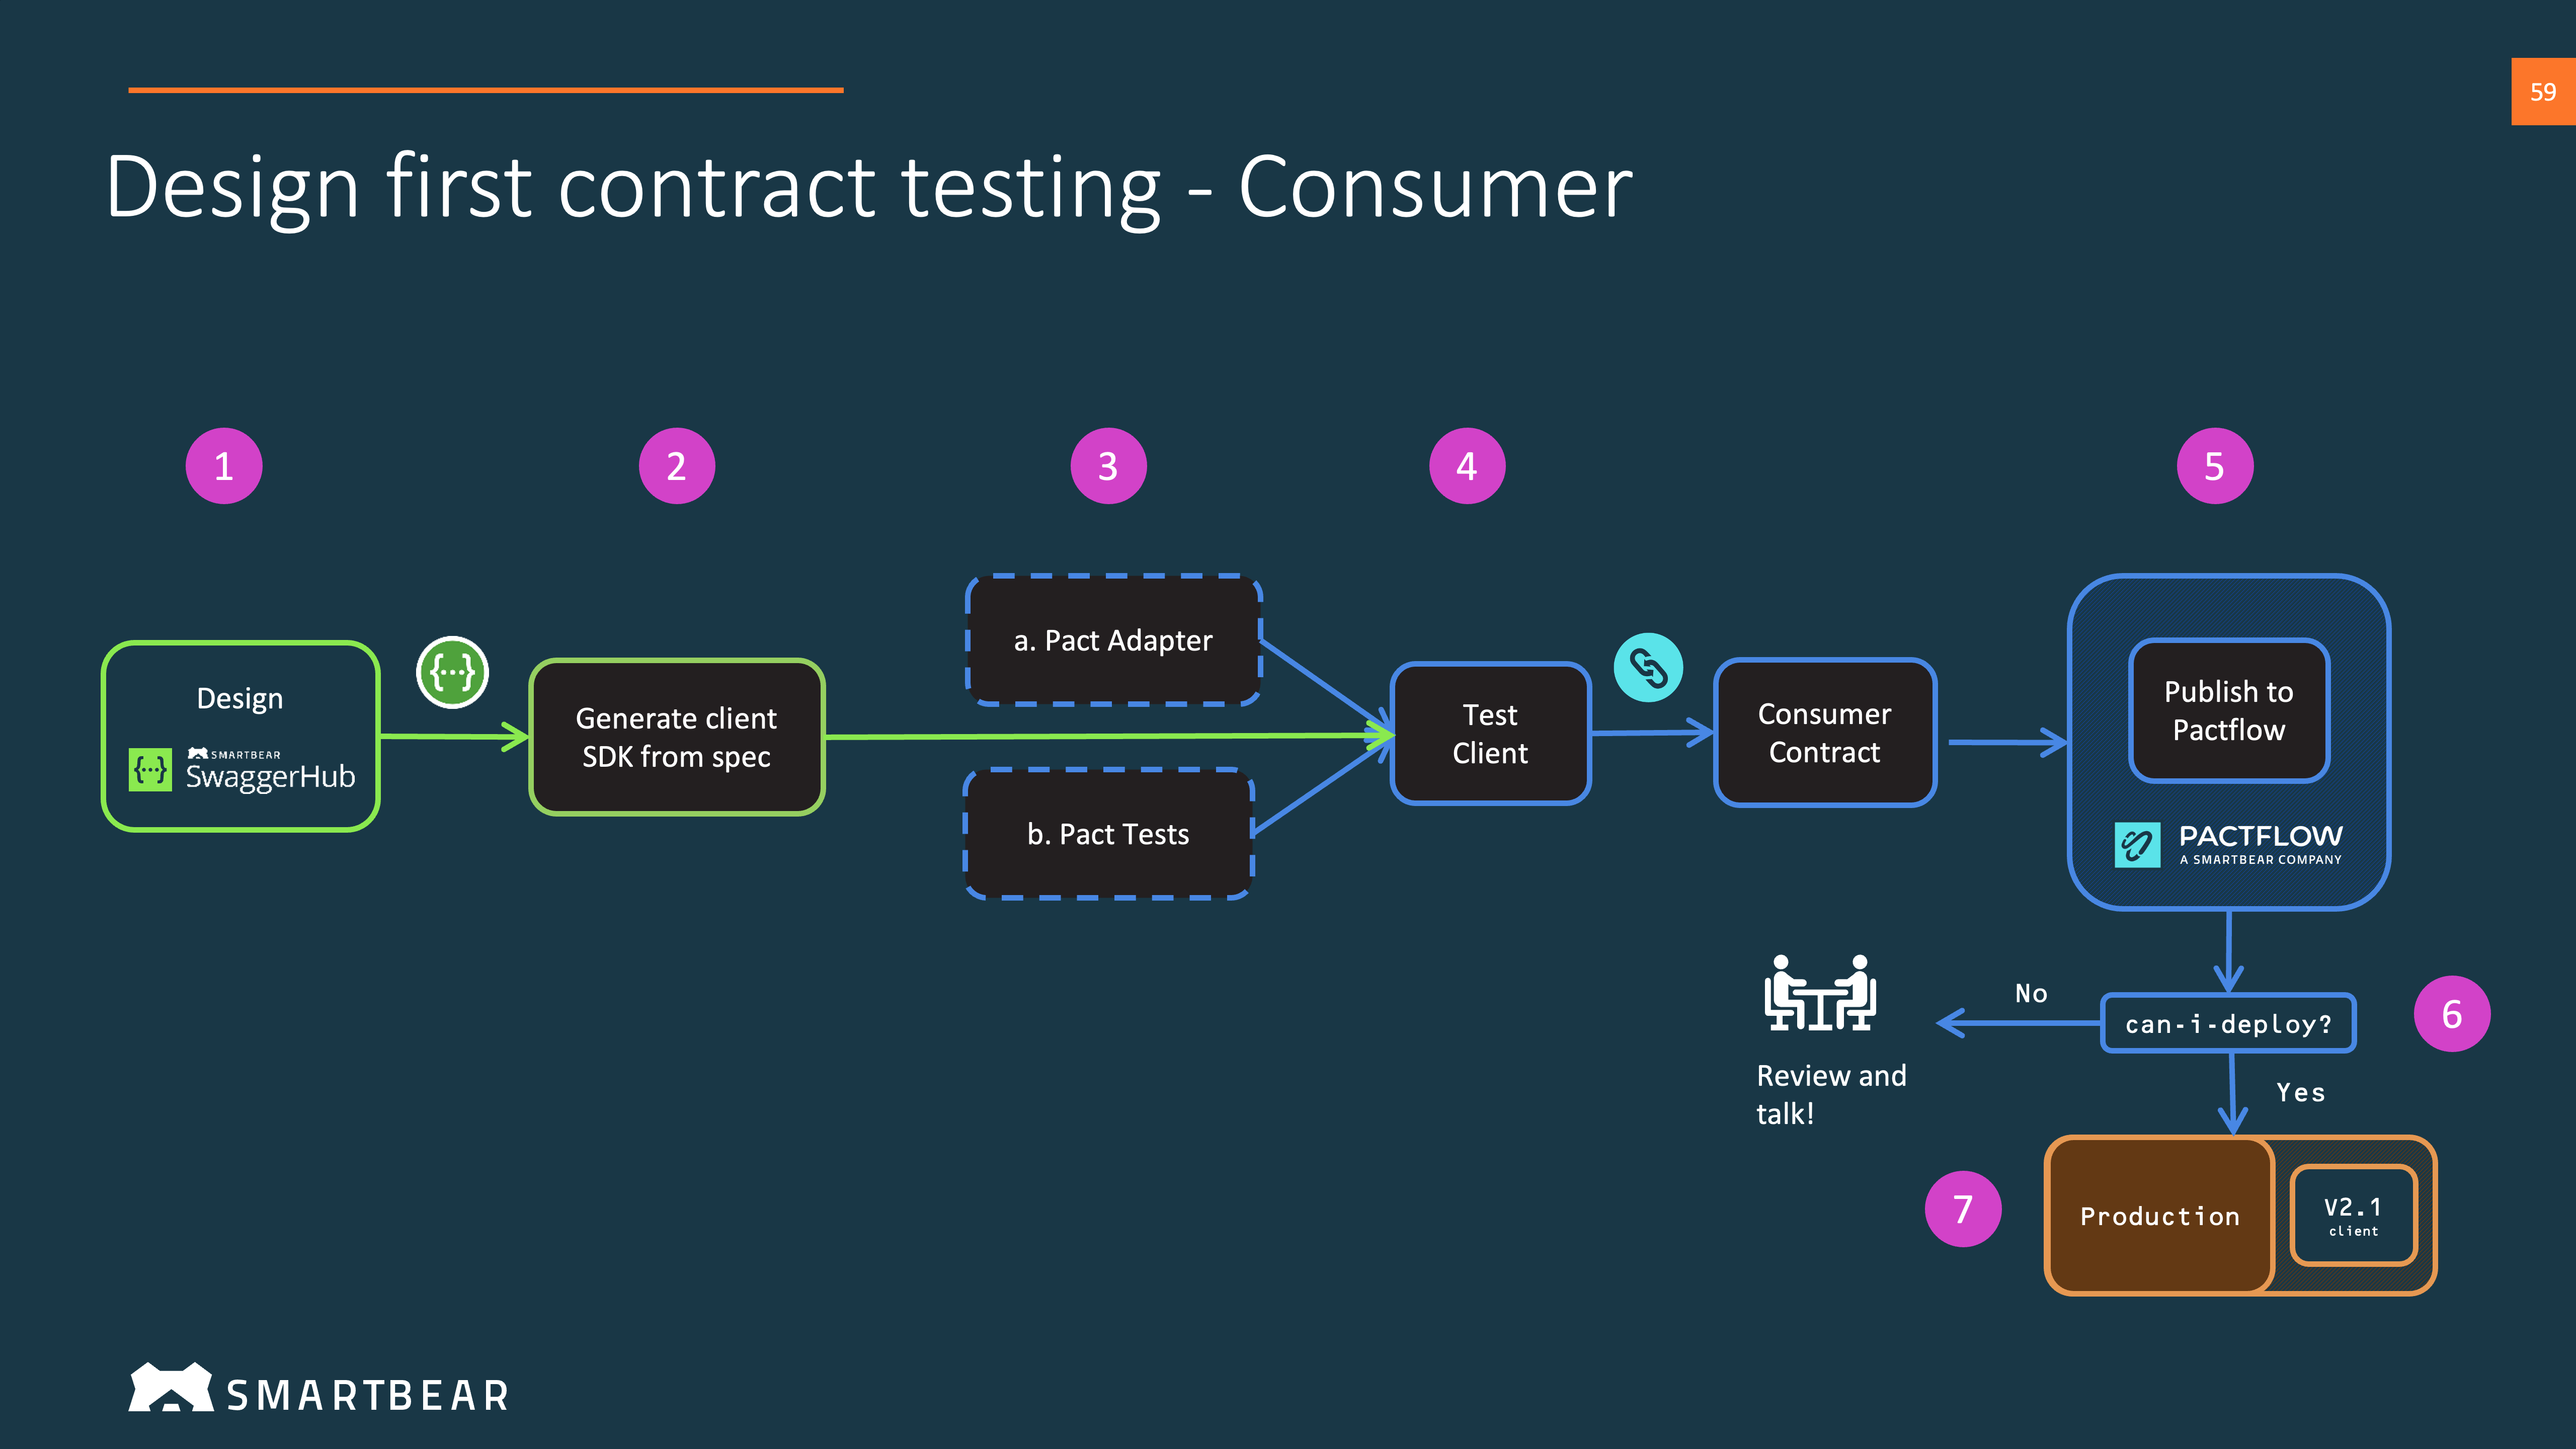
We can start the build of our consumer. We have the choice to build from our own framework, or generate an OAS compliant client SDK.
We can optionally use the server mocks from step (2).
- OAS compliant client SDK - See
./client-codegen- This needs to be modified slightly to be testable with the Pact framework, see
./client-codegen-pact- We added a unit-test Framework (Jest), Typescript and some other dependencies.
- We installed Pact-JS
- We updated
./client-codgen/api_test.spec.ts, see./client-codgen-pact/api_test.spec.ts
- You can use the
./.github/workflows/ConsumerCodeGen.ymlGitHub actions workflow to run these tests
- This needs to be modified slightly to be testable with the Pact framework, see
- Build our own - See
./consumer_code- We create a simple API client in a test file, that will exercise one of the endpoints in the OAS in
consumer_code/pact.test.js, running this test will generate a pact file. - In the test, we create contract tests for two consumers, each of them will depend on different fields from the provider.
- You can use the
./.github/workflows/ConsumerCodeSample.ymlGitHub actions workflow to run these tests
- We create a simple API client in a test file, that will exercise one of the endpoints in the OAS in
We can now test our consumer. This is the stage where we will capture the consumer contract. You can choose to use Pact, or convert your preferred mocks into a contract file.
See this guide and one of our BDCT examples for an idea of how to do this.
Publish your contsumer contract to Pactflow. We suggest to use the standard Pact CLI tools for this step.
Check if it's safe to release to your chosen test or staging environment using the can-i-deploy command.
You can now deploy your consumer to the same environment as your Auto Mock.
Use the record-deployment command to record that you have done this with Pactflow.
We now have a consumer deployed to a test environment, that uses the Auto Mock. The consumer can't yet be deployed to production, because the provider has not yet been built and released.
We can now repeat this process, but with the real provider which we can deploy to real environments.
For the general Provider test and release workflow, see our Provider Side Bi-Directional Contract Testing Guide.
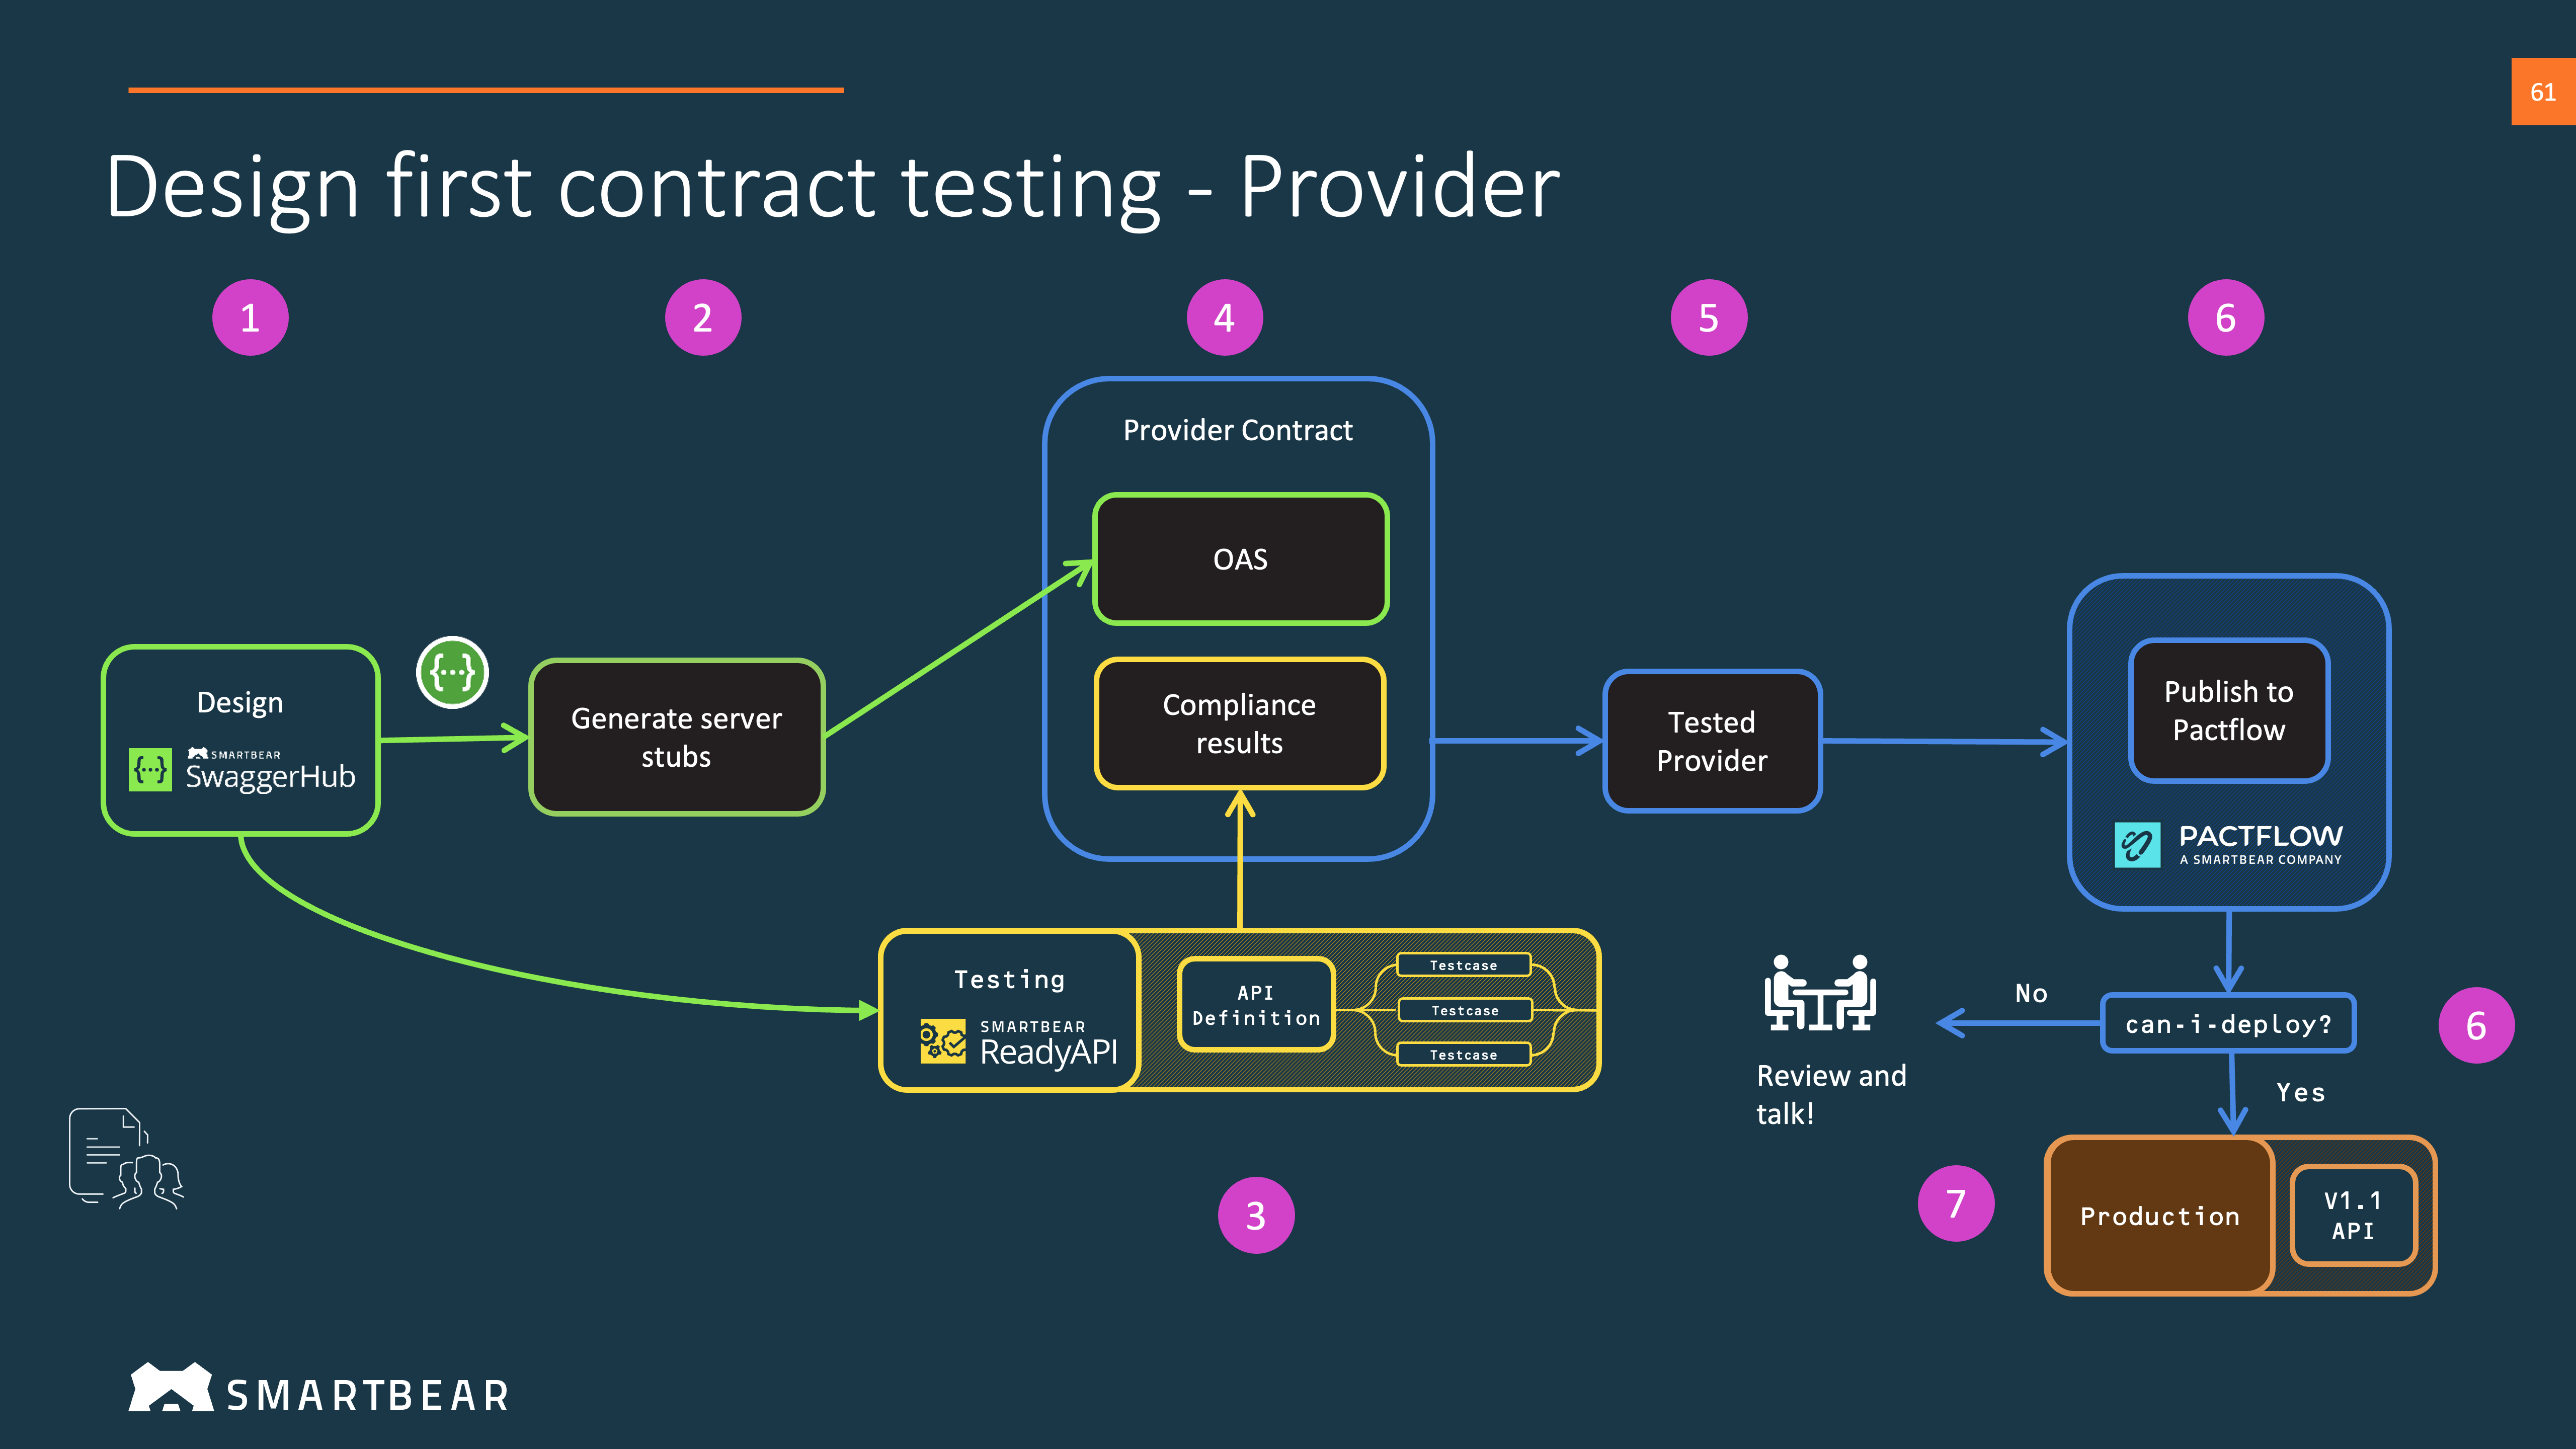
We can start the build of our provider. We have the choice to build from our own framework, or generate OAS compliant server stubs.
- OAS compliant server stubs - See
./server-codegen- You can use the
./.github/workflows/ServerCodeGen.ymlGitHub actions workflow to run these tests
- You can use the
Using the test framework created in 3.1, we can test our real implementation.
Publish your OAS and the test results from your chosen API testing tool to Pactflow.
Check if it's safe to release to your chosen test or staging environment using the can-i-deploy command.
You can now deploy your real provider to the nominated test environment.
Use the record-deployment command to record that you have done this with Pactflow.
We can repeat steps 3-5 for the various environments and as we iterate on the design and implementation.


