| title | excerpt | toc | toc_sticky | toc_label | header | categories | tags | last_modified_at | |||||
|---|---|---|---|---|---|---|---|---|---|---|---|---|---|
[디자인 패턴] Chapter 8. 추상적(Abstract) 패턴 |
Hiroshi Yuki, Java 언어로 배우는 디자인 패턴 입문 |
true |
true |
Ch8. 추상적(Abstract) 패턴 |
|
|
|
2020-04-16 18:00:00 +0900 |
- '추상적(abstract)'
- 구체적으로 어떻게 구현되는지는 생각하지 않고 인터페이스(API)만을 주목하고 있는 상태
- 예: 추상 메소드(abstract method)
- 메소드의 본체는 쓰여저 있지 않고, 이름과 시그너처(인자의 형과 갯수, 반환형)만 정해져 있는 메소드
- 추상적인 공장에서 추상적인 부품을 조립하여 추상적인 제품을 만든다
- 하위 클래스에서 구체적인 구현을 수행한다
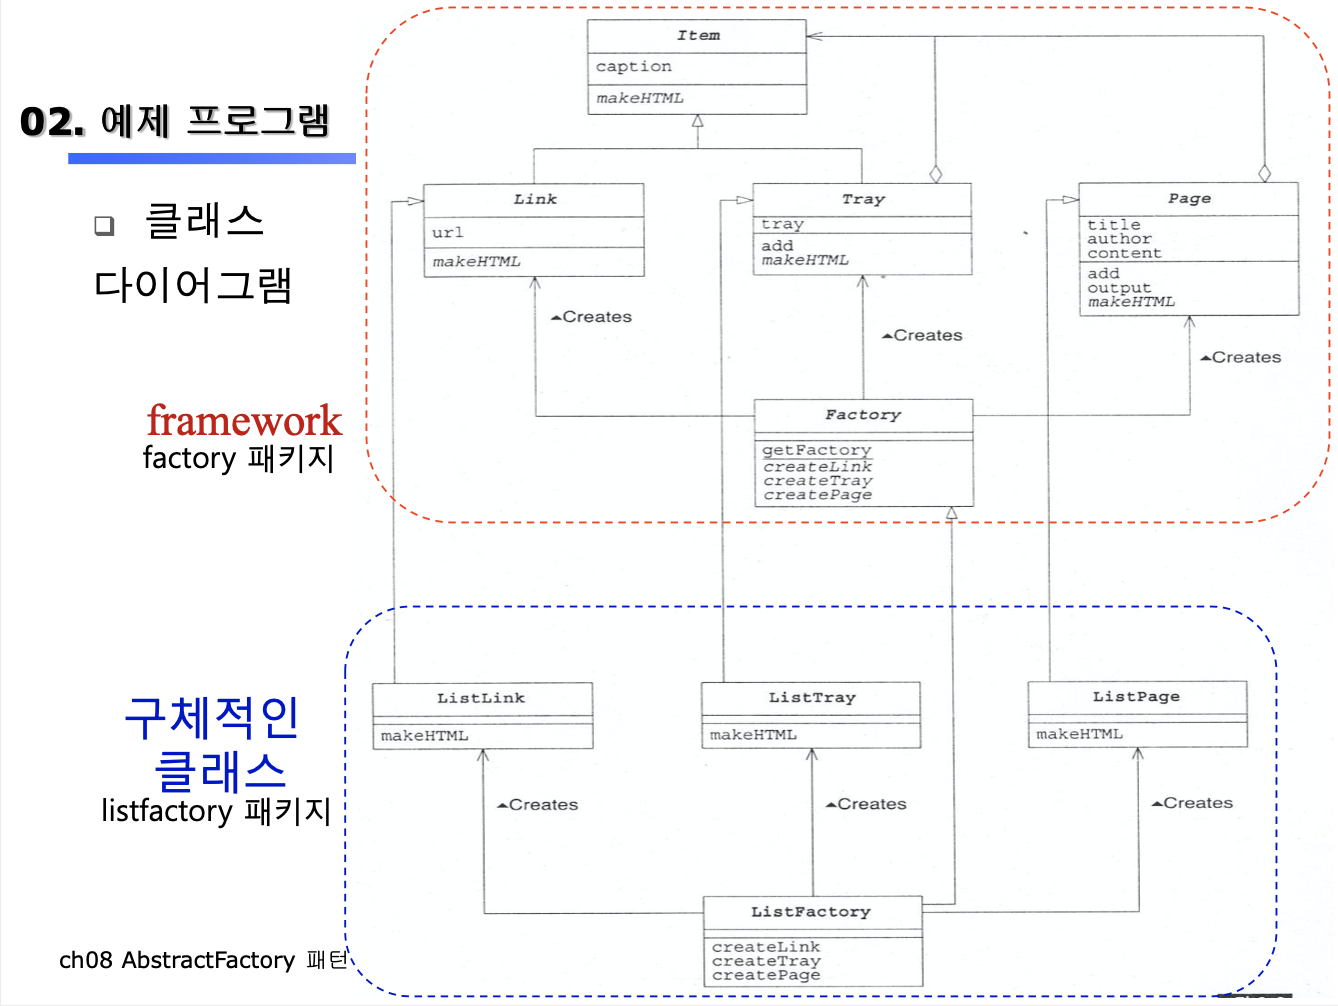
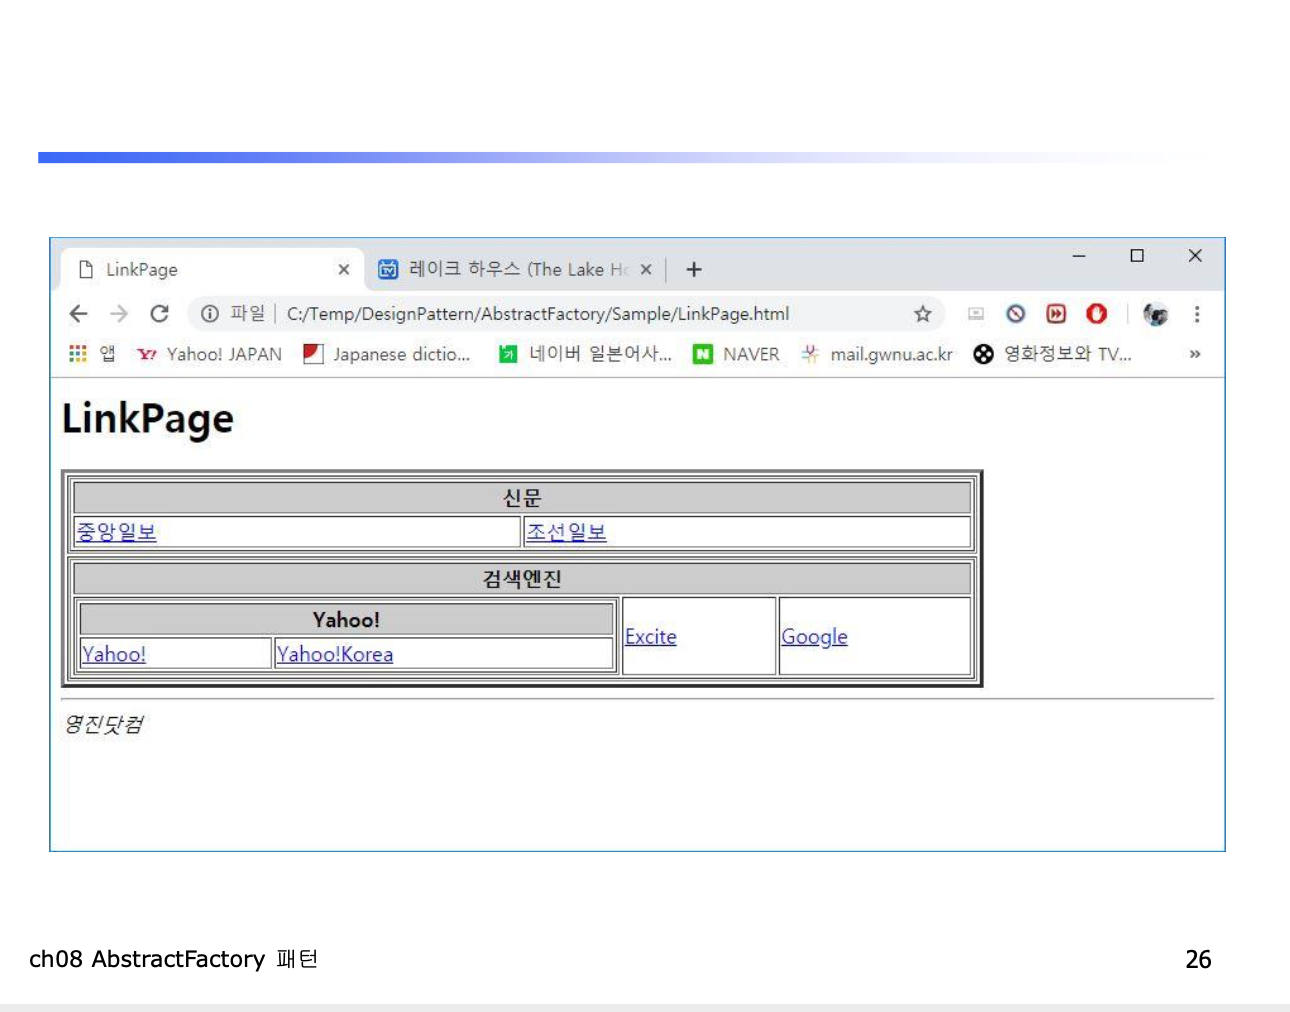
- 계층 구조를 가진 Link 페이지를 HTML 파일로 만드는 프로그램
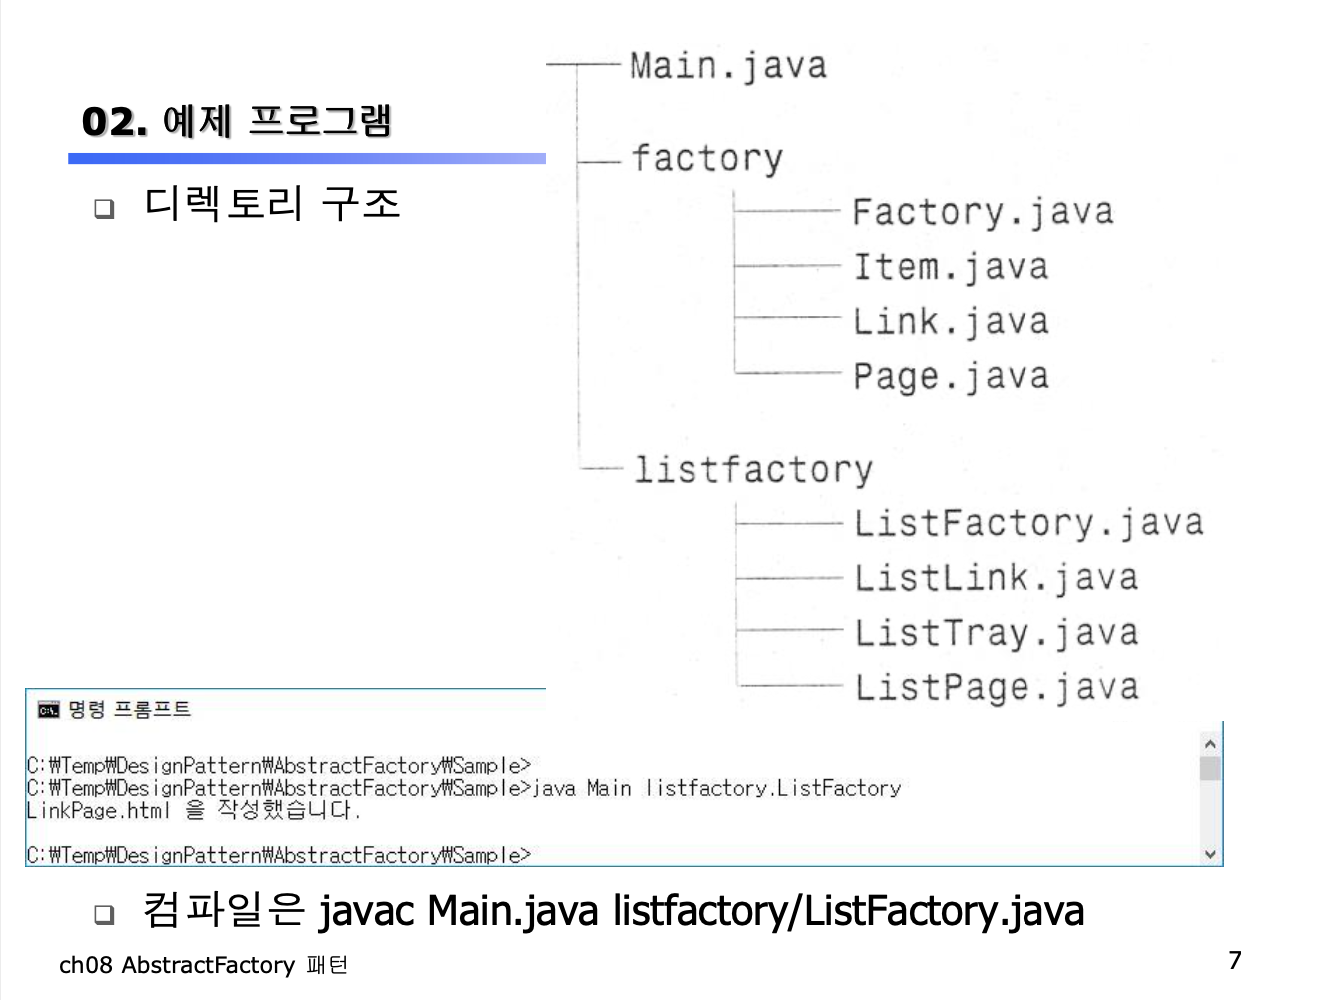
- 세 가지 패키지
- factory 패키지: 추상적인 공장, 부품, 제품을 포함한 패키지
- 이름 없는 패키지: Main 클래스를 포함한 패키지
- listfactory 패키지: 구체적인 공장, 부품, 제품을 포함한 패키지
| 패키지 | 이름 | 해설 |
|---|---|---|
| factory | Factory | 추상적인 공장을 나타내는 클래스(Link, Tray, Page를 만듬) |
| Item | Link와 Tray를 통일적으로 다루기 위한 클래스 | |
| Link | 추상적인 부품: HTML의 링크를 나타내는 클래스 | |
| Tray | 추상적인 부품: Link와 Tray를 모은 클래스 | |
| Page | 추상적인 제품: HTML의 페이지를 나타내는 클래스 | |
| Anonymous | Main | 동작 테스트용 클래스 |
| listfactory | ListFactory | 구체적인 공장을 나타내는 클래스(ListLink, ListTray, ListPage를 만듬) |
| ListLink | 구체적인 부품: HTML의 링크를 나타내는 클래스 | |
| ListTray | 구체적인 부품: Link나 Tray를 모은 클래스 | |
| ListPage | 구체적인 제품: HTML의 페이지를 나타내는 클래스 |
- Link와 Tray의 상위 클래스
- Link나 Tray를 동일시 하기 위한 클래스
- caption 필드
- 목차를 담는 변수
- makeHTML()
- HTML의 문자열을 반홤함
- 하위 클래스에서 구현되도록 기대됨
package factory;

public abstract class Item {
	protected String caption;
	public Item(String caption) {
		this.caption = caption;
	}
	public abstract String makeHTML();
}- HTML의 하이퍼링크를 추상적으로 표현한 클래스
- url 필드
- URL을 저장하는 변수
- 상위 클래스 Item에서 상속받은 makeHTML() 메소드가 구현되어 있지 않으므로, 추상 클래스이다
package factory;

public abstract class Link extends Item {
	protected String url;
	public Link(String caption, String url) {
		super(caption);
		this.url = url;
	}
}- 다수의 Link나 Tray를 모아 집합으로 만드는 클래스
- tray 필드
- ArrayList 객체 이용
- add()
- 항목을 추가할 때 호출되는 메소드
- Link와 Tray의 상위 클래스인 Item을 인수로 가짐
- 상위 클래스 Item에서 상속받은 makeHTML() 메소드가 구현되어 있지 않으므로, 추상 클래스이다
package factory;
import java.util.ArrayList;

public abstract class Tray extends Item {
	protected ArrayList tray = new ArrayList();
	public Tray(String caption) {
		super(caption);
	}
	public void add(Item item) {
		try.add(item);
	}
}- HTML 페이지 전체를 추상적으로 표현한 클래스
- Link, Tray는 부품, Page는 제품을 나타낸다
- title, author 필드
- add()
- Item(Link나 Tray)을 추가할 때 사용되는 메소드
- output()
- makeHTML()의 결과를 파일에 쓴다
writer.write(this.makeHTML()); - 간단한 Template Method 패턴
- makeHTML()의 결과를 파일에 쓴다
package factory;
import java.io.*;
import java.util.ArrayList;

public abstract class Page {
	protected String title;
	protected String author;
	protected ArrayList content = new ArrayList();
	public Page(String title, String author) {
		this.title = title;
		this.author = author;
	}
	public void add(Item item) {
		content.add(item);
	}
	public void output() {
		try {
			string filename = title + ".html";
			Writer writer = new FileWriter(filename);
			writer.write(this.makeHTML());
			writer.close();
			System.out.println(filename + "을 작성했습니다.");
		} catch (IOException e) {
			e.printStackTrace();
		}
	}
	public abstract String makeHTML();
}- getFactory()
- 구체적인 공장을 나타내는 클래스명을 인자로 받아서, 그 클래스의 객체를 반환하는 메소드
factory = (Factory)Class.forName(classname).newInstance(); - Class 클래스의 forName 메소드를 사용해서, 그 클래스를 동적으로 읽음. 그리고 newInstance 메소드를 이용해서, 그 클래스의 인스턴스를 한 개 작성
- 이 메소드의 반환 타입은, Factory(즉, 구체적인 공장의 상위클래스) 추상클래스이다
- 구체적인 공장을 나타내는 클래스명을 인자로 받아서, 그 클래스의 객체를 반환하는 메소드
package factory;

public abstract class Factory {
	public static Factory getFactory(String classname) {
		Factory factory = null;
		try {
			factory = (Factory)Class.forName(classname).newInstance();
		} catch (ClassNotFoundException e) {
			System.err.println("클래스" + classname + "이 발견되지 않습니다.");
		} catch (Exception e) {
			e.printStackTrace();
		}
		return factory;
	}
	public abstract Link createLink(String caption, String url);
	public abstract Tray createTray(String caption);
	public abstract Page createPage(String title, String author);
}- import되어 있는 것은, factory 패키지 뿐이다
- 즉, 구체적인 공장은 전혀 사용하지 않는다
- 구체적인 공장의 클래스명은, 커맨드 라인 인자로 지정한다
c:> java Main listfactory.ListFactorylistfactory.ListFactory가 args[0]으로 전달된다
- args[0]와 Factory.getFactory를 이용하여 구체적인 공장의 인스턴스를 얻어온다
Factory factory = Factory.getFactory(args[0]);
- 공장의 메소드를 이용하여 부품과 제품을 생산한다
import factory.*;

public class Main {
  public static void main(String[] args) {
    if (args.length != 1) {
      System.out.println("Usage: java Main clas.name.of.ConcreteFactory");
      System.out.println("Example 1: java Main listfactory.ListFactory");
      System.out.println("Example 2: java Main tablefactory.TableFactory");
      System.exit(0);
    }
    Factory factory = Factory.getFactory(args[0]);

    Link joins = factory.createLink("중앙일보", "http://www.joins.com/");
    Link chosun = factory.createLink("조선일보", "http://www.chosun.com/");

    Link us_yahoo = factory.createLink("Yahoo!", "http://www.yahoo.com/");
    Link kr_yahoo = factory.createLink("Yahoo!Korea", "http://www.yahoo.co.kr/");
    Link excite = factory.createLink("Excite", "http://www.excite.com/");
    Link google = factory.createLink("Google", "http://www.google.com/");

    Tray traynews = factory.createTray("신문");
    traynews.add(joins);
    traynews.add(chosun);

    Tray trayyahoo = factory.createTray("Yahoo!");
    trayyahoo.add(us_yahoo);
    trayyahoo.add(kr_yahoo);

    Tray traysearch = factory.createTray("검색엔진");
    traysearch.add(trayyahoo);
    traysearch.add(excite);
    traysearch.add(google);

    Page page = factory.createPage("LinkPage", "영진닷컴");
    page.add(traynews);
    page.add(traysearch);
    page.output();
  }
}- 상위 클래스인 Factory의 createLink, createTray, creatPage 메소드를 구현함
- 구체적인 부품과 제품인 ListLink, ListTray, ListPage를 생성함
package listfactory;
import factory.*;

public class ListFactory extends Factory {
	public Link createLink(String caption, String url) {
		return new ListLink(caption, url);
	}
	public Tray createTray(String caption) {
		return new ListTray(caption);
	}
	public Page createPage(String title, String author) {
		return new ListPage(title, author);
	}
}- Link의 하위 클래스
- makeHTML() 구현
<li>와<a>태그를 이용해서, HTML의 일부분을 작성함<li>: 리스트 항목<a>: 하이퍼링크의 anchor
package listfactory;
import factory.*;

public class ListLink extends Link {
	public ListLink(String caption, String url) {
		super(caption, url);
	}
	public String makeHTML() {
		return " <li><a href=\"" + url + "\">" + caption + "</a></li>\n";
	}
}- Tray의 하위클래스
- makeHTML() 구현
<li>와 목차 출력 후,<ul>을 출력하고, tray ArrayList(상위클래스에서 상속함)에 담겨있는 각 항목을 출력한다- tray.iterator()를 이용하여 ArrayList의 iterator를 얻어옴
- 각 항목의 makeHTML()을 호출하여, HTML 내용을 얻어온다
package listfactory;
import factory.*;
import java.util.Iterator;

public class ListTray extends Tray {
	public ListTray(String caption) {
		super(caption);
	}
	public String makeHTML() {
		StringBuffer buffer = new StringBuffer();
		buffer.append("<li>\n");
		buffer.append(caption + "\n");
		buffer.append("<ul>\n");
		Iterator it = tray.iterator();
		while (it.hasNext()) {
			Item item = (Item)it.next();
			buffer.append(item.makeHTML());
		}
		buffer.append("</ul>\n");
		buffer.append("</li>\n");
		return buffer.toString();
	}
}- Page의 하위클래스
- makeHTML() 구현
<html><head><title>등의 앞부분 태그를 출력한다<ul>출력 후, content ArrayList(상위클래스에서 상속)에 담겨있는 각 항목을 출력한다
package listfactory;
import factory.*;
import java.util.Iterator;

public class ListPage extends Page {
	public ListPage(String title, String author) {
		super(title, author);
	}
	public String makeHTML() {
		StringBuffer buffer = new StringBuffer();
		buffer.append("<html><head><title>" + title + "</title></head>\n");
		buffer.append("<body>\n");
		buffer.append("<h1>" + title + "</h1>\n");
		buffer.append("<ul>\n");
		Iterator it = content.iterator();
		while (it.hasNext()) {
			Item item = (Item)it.next();
			buffer.append(item.makeHTML());
		}
		buffer.append("</ul>\n");
		buffer.append("<hr><address>" + author + "</address>");
		buffer.append("</body></html>\n");
		return buffer.toString();
	}
}- 또 하나의 구체적인 공장을 추가해 본다
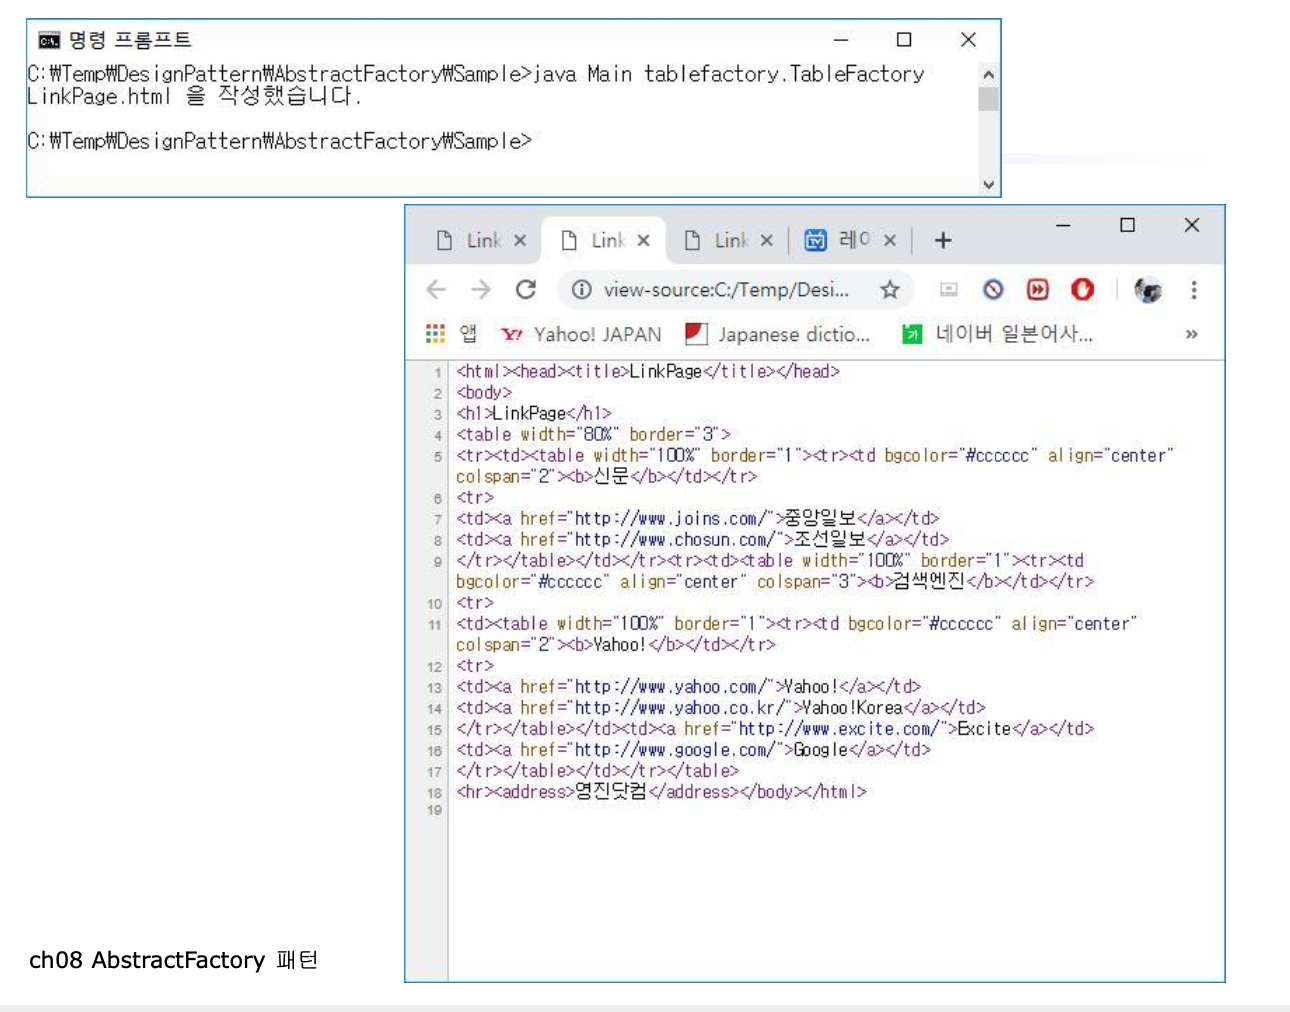
- 테이블 형태로 항목을 보여주는 HTML 파일을 생성하는 공장
| 패키지 | 이름 | 해설 |
|---|---|---|
| tablefactory | TableFactory | 구체적인 공장을 나타내는 클래스(TableLink, TableTray, TablePage를 만듬) |
| TableLink | 구체적인 부품: HTML의 링크를 나타내는 클래스 | |
| TableTray | 구체적인 부품: TableLink나 TableTray를 모은 클래스 | |
| TablePage | 구체적인 제품: HTML의 페이지를 나타내는 클래스 |
- Factory의 하위클래스
package tablefactory;
import factory.*;

public class TableFactory extends Factory {
	public Link createLink(String caption, String url) {
		return new TableLink(caption, url);
	}
	public Tray createTray(String caption) {
		return new TableTray(caption);
	}
	public Page createPage(String title, String author) {
		return new TablePage(title, author);
	}
}- Link의 하위클래스
- makeHTML()
<td>와<a>태그를 이용해서, 표에 들어갈 하이퍼링크 항목 HTML 문자열을 생성한다
package tablefactory;
import factory.*;

public class TableLink extends Link {
	public TableLink(String caption, String url) {
		super(caption, url);
	}
	public String makeHTML() {
		return "<td><a href=\"" + url + "\">" + caption + "</a></td>\n");
	}
}- Tray의 하위클래스
- makeHTML()
<td>와<table>태그를 이용해서, Item들을 출력한다
<td>
<table>
  <tr>
    <td> 제목 </td>
  </tr>
  <tr>
    URL 항목들
  </tr>
</table>
</td>
package tablefactory;
import factory.*;
import java.util.Iterator;
public class TableTray extends Tray {
public TableTray(String caption) {
super(caption);
}
public String makeHTML() {
StringBuffer buffer = new StringBuffer();
buffer.append("<td>");
buffer.append("<table width=\"100%\" border=\"1\"><tr>");
buffer.append("<td bgcolor=\"#cccccc\" align=\"center\" colspan=\"" + tray.size() + "\"><b>" + caption + "</b></td>");
buffer.append("</tr>\n");
buffer.append("<tr>\n");
Iterator it = tray.iterator();
while (it.hasNext()) {
Item item = (Item)it.next();
buffer.append(item.makeHTML());
}
buffer.append("</tr></table>");
buffer.append("</td>");
return buffer.toString();
}
}- Page의 하위클래스
<address>태그: 주소를 나타내는 문자열 표시
package tablefactory;
import factory.*;
import java.util.Iterator;

public class TablePage extends Page {
	public TablePage(String title, String author) {
		super(title, author);
	}
	public String makeHTML() {
		StringBuffer buffer = new StringBuffer();
		buffer.append("<html><head><title" + title + "</title></head>\n");
		buffer.append("<body>\n");
		buffer.append("<h1>" + title + "</h1>\n");
		buffer.append("<table width=\"80%\" border=\"3\">\n");
		Iterator it = content.iterator();
		while (it.hasNext()) {
			Item item = (Item)it.next();
			buffer.append("<tr>" + item.makeHTML() + "</tr>");
		}
		buffer.append("</table>\n");
		buffer.append("<hr><address>" + author + "</address>");
		buffer.append("</body></html>\n");
		return buffer.toString();
	}
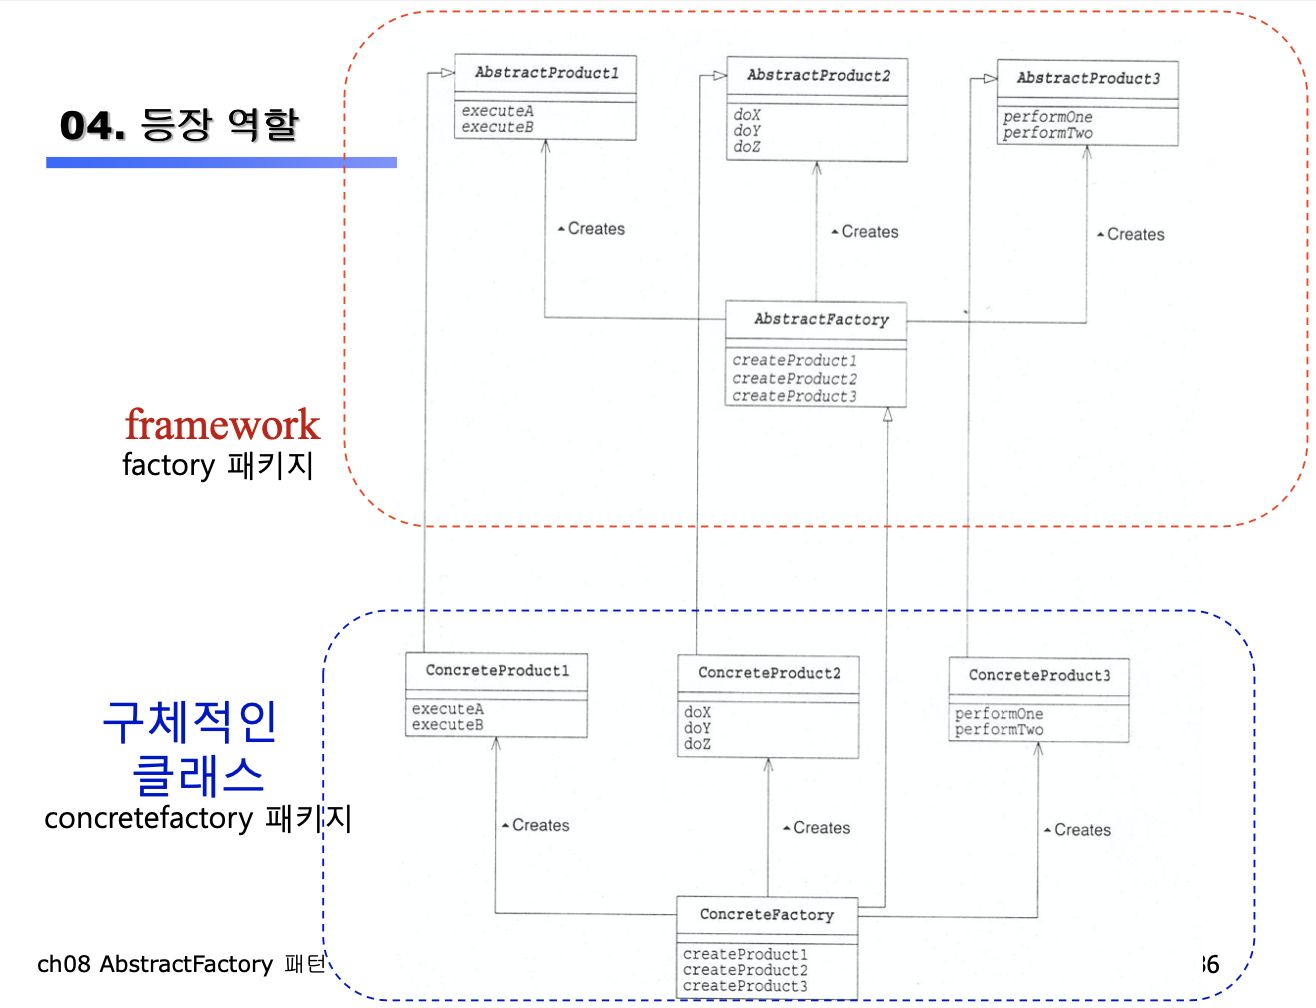
}- AbstractProduct 역할
- AbstractFactory가 생산하는 추상적인 부품이나 제품의 인터페이스(API) 결정
- 예제에서, Link, Tray, Page 클래스가 해당됨
- AbstractFactory 역할
- AbstractProduct의 인스턴스를 만들어내기 위한 인터페이스(API) 결정
- 예제에서, Factory 클래스가 해당됨
- Client의 역할
- AbstractFactory와 AbstractProduct의 인터페이스만을 사용해서 일을 수행
- 예제에서, Main 클래스가 해당됨
- ConcreteProduct 역할
- AbstractProduct 인터페이스 구현
- 예제에서
- listfactory 패키지: ListLink, ListTray, ListPage 클래스가 해당됨
- tablefactory 패키지: TableLink, TableTray, TablePage 클래스가 해당됨
- ConcreteFactory 역할
- AbstractFactory 인터페이스 구현
- 예제에서
- listfactory 패키지: ListFactory 클래스가 해당됨
- tablefactory 패키지: TableFactory 클래스가 해당됨
- 구체적인 공장을 새로 추가하는 것이 간단하다
- 구체적인 공장을 추가하거나 수정해도, client 부분(예제에서는 Main 클래스)이나 추상적인 공장의 코드를 수정할 필요가 없다
- 부품을 새로 추가하는 것은 곤란하다
- 예: Picture라는 부품을 추가한다면
- ListFactory 클래스에 createPicture 메소드를 추가해야 함
- 부품인 ListPicture 클래스를 새롭게 정의해야 함.
- 예: Picture라는 부품을 추가한다면
- Builder 패턴(7장)
- Factory Method 패턴(4장)
- Composite 패턴(11장)
- Singleton 패턴(5장)
- 예약어 new
- clone()
- Cloneable 인터페이스를 구현한 클래스가 자기 자신을 복제한 인스턴스를 생성할 때 호출함
- java.lang.Class 클래스의 newInstance() 메소드 이용
- 인수없는 생성자가 자동으로 호출된다
someobj.getClass().newInstance()
- 인수없는 생성자가 자동으로 호출된다
- 추상적인 부품을 조립해서 추상적인 제품을 만드는 추상적인 공장인 Abstract Factory 패턴
-
8-1
-
Tray 클래스에서 tray 필드가 protected로 정의되어 하위클래스에서 참조할 수 있다
-
tray 필드를 priavte로 했을 때의 장단점은?
- 장점: Tray의 하위클래스(구체적인 부품)로 상속되지 않으므로, Tray의 하위클래스(구체적인 부품)에서 tray 필드를 직접 접근할 수 없으며, 따라서 tray 필드를 하위클래스가 직접 수정할 수 없다
- Tray 클래스의 tray 필드 구현을 하위클래스에서 그대로 사용한다
- 단점
- tray 필드 접근을 위한 메소드를 Tray 클래스가 제공해주어야 한다
- 장점: Tray의 하위클래스(구체적인 부품)로 상속되지 않으므로, Tray의 하위클래스(구체적인 부품)에서 tray 필드를 직접 접근할 수 없으며, 따라서 tray 필드를 하위클래스가 직접 수정할 수 없다
-
예: 상위 클래스의 private 필드를 하위 클래스에서 접근할 수 없다
- 아래 코드는 컴파일 에러 발생함 (출력부분에서 에러발생)
 class SuperClass {
   private int priv1 = 10;
   protected int prot1 = 11;
 }
 public class SubClass extends SuperClass {
   public static void main(String args[]) {
     SubClass sub = new SubClass();
     System.out.println("priv1 = " + sub.priv1);
     System.out.println("prot1 = " + sub.prot1);
   }
 }
-
예: 상위클래스의 private 필드를 하위클래스에서 접근할 수 없으므로, 이 필드를 접근하기 위한 액세스 메소드를 제공해야한다
 class Super Class {
   private int priv1 = 10;
   protected int prot1 = 11;
   public int getPriv1() {
     return priv1;
   }
 }
 public clas SubClass extends SueperClass {
   public static void main(String args[]) {
     SubClass sub = new SubClass();
     System.out.println("priv1 = " + sub.getPriv1() );
     System.out.println("prot1 = " + sub.prot1);
   }
 }
-
-
8-2
- Yahoo 사이트의 URL(http://www.yahoo.com/) 링크만을 포함하는 페이지를 반환하는 다음과 같은 메소드를 예제 프로그램의 Factory 클래스에 추가하시오. 이 때 구체적인 공장과 구체적인 부품은 어떻게 변경해야 합니까?
 public Page createYahooPage() {
   // createLink()를 이용해서 Yahoo URL 생성함
   // createPage()를 이용해서 Yahoo 페이지 생성함
   // Page의 add()를 이용해서 Link를 추가함
   // Page 객체를 반환함
 }
- 구체적인 공장과 부품은 변화가 없다 -
8-3
- ListLink 클래스의 생성자는, 상위클래스의 생성자를 호출하는 것 뿐이다
 public ListLink(String caption, String url) {
   super(caption, url);
 }
- 특별한 처리가 없는데, 왜 일부러 ListLink의 생성자를 정의하고 있나?
- 생성자는 상속받지 않기 때문이다
- ListLink() 생성자를 구현하지 않고, 다음과 같이 호출할 수 없다
ListLink ll=new ListLink("Yahoo!", http://www.yahoo.com/);
- 하위클래스의 객체 생성시, 상위클래스의 "인자없는 생성자"를 자동으로 호출한다
 class SuperClass {
   private int priv1 = 10;
   protected int prot1 = 11;
   SuperClass() {
     priv1 = 999;
   }
   public int getPriv1() {
     return priv1;
   }
 }
 public class SubClass extends SuperClass {
   SubClass() {
     prot1 = 888;
   }
   public static void main(String args[]) {
     SubClass sub = new SubClass();
     System.out.println("priv1 = " + sub.getPriv1());
     System.out.println("prot1 = " + sub.prot1);
   }
 }
- 하위클래스의 객체 생성시, 상위클래스의 "인자있는 생성자"를 호출하려면, 하위클래스에서 생성자를 따로 만들어야 한다
 class SuperClass {
   private int priv1 = 10;
   protected int prot1 = 11;
   SuperClass() {
     priv1 = 999;
   }
   SuperClass(int a) {
     priv1 = a;
   }
   public int getPriv1() {
     return priv1;
   }
 }
 public class SubClass extends SuperClass {
   SubClass(int x) {
     Super(x);
   }
   public static void main(String args[]) {
     SubClass sub = new SubClass(777);
     System.out.println("priv1 = " + sub.getPriv1());
     System.out.println("prot1 = " + sub.prot1;
   }
 }
-
8-4
- Page 클래스가 Tray 클래스와 비슷한 역할을 하는데, 왜 Page 클래스를 Tray 클래스의 하위 클래스로 하지 않았는가?
- Page를 Tray 클래스의 하위로 만들면, Page도 Item의 하위클래스가 되어 add의 대상이 된다
- 그러나, Page는 Tray에 add 할 수 없기 때문에(HTML의 문법상 부적절) 그렇게 하지 않았다
- Page 클래스가 Tray 클래스와 비슷한 역할을 하는데, 왜 Page 클래스를 Tray 클래스의 하위 클래스로 하지 않았는가?

