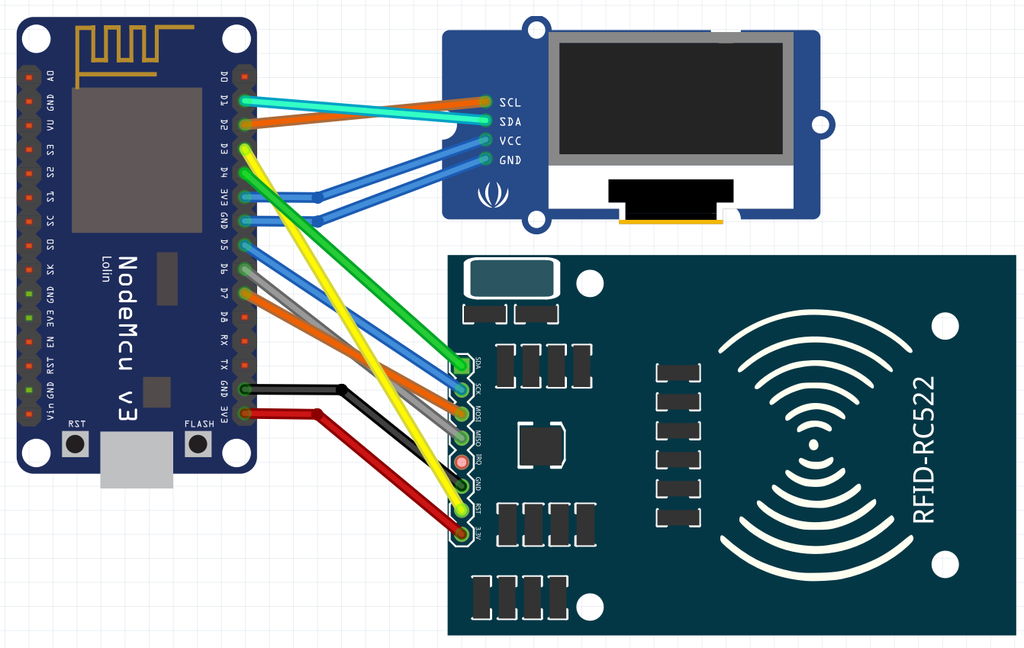
This project is an RFID Attendance System built using an ESP8266 microcontroller. It leverages RFID technology to scan student and faculty ID cards and mark attendance or verify faculty login via a web API. The system features a Liquid Crystal Display (LCD) to provide real-time feedback and status updates.
- WiFi Connectivity: Connects to a specified WiFi network to communicate with an online API.
- RFID Scanning: Reads RFID cards to identify students and faculty members.
- Attendance Marking: Sends attendance data to a server via HTTP POST requests.
- Faculty Login Verification: Checks the faculty ID against an API to confirm their login.
- Real-Time Feedback: Displays messages on an LCD for user interaction and status updates.
- Error Logging: Logs any errors encountered during operation to EEPROM for later review.
- ESP8266: A low-cost WiFi microcontroller used for communication.
- RFID Reader: MFRC522 module for reading RFID tags.
- Liquid Crystal Display (LCD): I2C LCD to display messages and status updates.
- EEPROM: For logging errors and retaining information across reboots.
-
ESP8266: Connect the ESP8266 to your computer for programming.
-
RFID Reader:
- SDA pin to GPIO2 (D4 on some boards)
- RST pin to GPIO0 (D3 on some boards)
- VCC to 3.3V
- GND to GND
-
LCD:
- Connect the I2C LCD to the ESP8266's I2C pins (typically GPIO4 and GPIO5).
Make sure you have the following libraries installed in your Arduino IDE:
- MFRC522: For RFID communication.
- LiquidCrystal_I2C: For I2C LCD communication.
- ArduinoJson: For handling JSON data.
- ESP8266WiFi: For WiFi connectivity.
- WiFi Credentials: Update the
ssidandpasswordvariables in the code with your WiFi credentials. - API Endpoints: Set the
hostvariable to your API's base URL, and ensure that the faculty login and attendance mark URLs are correct.
- Initializes the Serial monitor, EEPROM, I2C LCD, and connects to WiFi.
- Sets up the RFID reader.
- Continuously checks for new RFID cards.
- If a card is detected, it reads the card data and decides whether to mark attendance or check for faculty login.
connectToWiFi(): Establishes a WiFi connection.initializeRFID(): Initializes the RFID reader.readCardData(): Reads the RFID data and extracts student and faculty IDs.checkFacultyLogin(): Sends a POST request to the API with the faculty ID for verification.markAttendance(): Sends a POST request to mark the attendance for the detected student ID.logError(String message): Logs error messages to EEPROM for later review.getLog(): Retrieves the logged errors from EEPROM.
- Upload the code to your ESP8266 board using the Arduino IDE.
- Open the Serial Monitor to view logs and connection status.
- Present an RFID card to the reader; the system will automatically process attendance or login requests based on the card data.
- Use the LCD to monitor the status of operations and any errors.
- Ensure your RFID and LCD connections are secure.
- Verify the WiFi credentials and API URLs are correct.
- Check the Serial Monitor for error messages and debugging information.
This RFID Attendance System serves as a robust solution for automated attendance marking and faculty verification, enhancing efficiency in educational institutions. Feel free to contribute to this project or use it as a foundation for your own implementations.
